
How to Prepare Walls Before Painting: Complete Guide
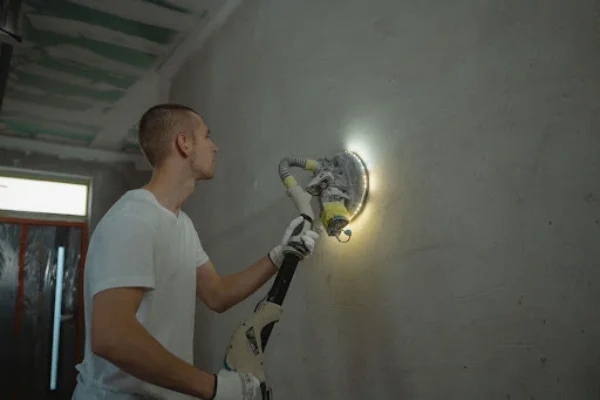
Knowing how to prepare walls before painting is essential for achieving a smooth, durable, and professional finish. A flawless paint result doesn’t begin with the paint, it begins with proper wall preparation. Whether for residential, commercial, or industrial spaces, preparing the surface correctly ensures strong adhesion, long lasting durability, and a clean appearance. Skipping this step often leads to issues such as peeling, cracking, and uneven results.
Understanding how to prepare walls before painting also helps improve the overall quality of the project. Surfaces affected by dust, grease, moisture, or minor damage can prevent paint from bonding effectively. By making sure the wall is clean, smooth, and properly treated, you create the ideal base for a consistent and refined finish.
In regions like the UAE, where walls are exposed to heat, humidity, and dust, learning how to prepare walls before painting becomes even more important. Proper preparation not only enhances the final look but also improves paint performance over time, reducing the need for frequent maintenance or repainting.
Why Wall Preparation Is Important in Abu Dhabi, UAE?
Before applying paint, it is essential to understand the importance of proper surface preparation. This step lays the foundation for a high quality and long lasting finish.
- Ensures strong paint adhesion to the surface
- Improves durability and extends the lifespan of the paint
- Creates a smooth and even finish
- Prevents common issues such as peeling, cracking, and bubbling
- Enhances the overall appearance of the space
Proper wall preparation not only improves the final look but also ensures that the paint performs effectively over time.
Step by Step Wall Preparation Process
Proper wall preparation follows a structured approach to ensure the surface is fully ready for painting. Each step plays a specific role in improving adhesion, finish quality, and durability. By following this process carefully, you can achieve a professional result while minimizing future maintenance issues.
1. Inspect the Surface
Begin by carefully assessing the overall condition of the wall. This helps identify underlying issues that may affect the paint performance.
- Check for cracks, holes, damp patches, or peeling paint
- Identify mold growth, stains, or grease marks
- Look for uneven textures or surface irregularities
A detailed inspection ensures that all problem areas are addressed before moving forward.
2. Clean the Walls
Cleaning is essential to remove contaminants that can prevent proper paint bonding. Even surfaces that appear clean may have invisible dust or grease.
- Remove loose dust using a dry cloth, brush, or vacuum
- Wash the wall with mild detergent and clean water
- Use a suitable degreaser for kitchen or high traffic areas
- Allow sufficient time for the wall to dry completely
A properly cleaned surface significantly improves paint adhesion and finish consistency.
3. Remove Old Paint
Old, flaking, or unstable paint layers must be removed to create a solid base. Painting over damaged paint can lead to early failure.
- Scrape off peeling or blistered paint using appropriate tools
- Smooth out edges with sandpaper to blend the surface
- For larger or heavily damaged areas, use mechanical sanding
This step ensures the new paint adheres evenly and lasts longer.
4. Repair Cracks and Holes
Surface imperfections should be corrected to achieve a uniform finish. Ignoring these defects will make them visible after painting.
- Fill cracks and holes with high quality filler or putty
- Use a putty knife to level and smooth the repaired areas
- Allow adequate drying time before proceeding
Proper repairs create a seamless and professional looking surface.
5. Sand the Surface
Sanding refines the wall surface and prepares it for coating. It helps eliminate roughness and ensures uniform texture.
- Use fine grit sandpaper for even smoothing
- Focus on repaired areas and uneven patches
- Remove all sanding dust with a clean cloth or vacuum
A smooth surface enhances both paint adhesion and final appearance.
6. Apply Wall Putty
Wall putty is used to achieve a flawless and consistent base. It improves surface strength and finish quality.
- Apply a thin and even layer across the wall
- Allow it to dry completely before sanding lightly
- Apply an additional coat if required for better smoothness
This step ensures the wall is perfectly leveled and ready for painting.
7. Apply Primer
Primer acts as a bonding layer between the wall and the paint. It also helps improve paint performance and color uniformity.
- Choose the right primer based on surface type and conditions
- Apply one or two coats depending on the requirement
- Maintain proper drying intervals between coats
Using primer reduces paint absorption and enhances durability.
8. Final Surface Check
Before starting the painting process, a final inspection is necessary to ensure everything is in place.
- Confirm the surface is clean, dry, and smooth
- Check for any missed cracks, patches, or uneven areas
- Make any final touch ups if required
A thorough final check ensures the surface is fully prepared for a high quality paint finish.
Common Wall Preparation Mistakes to Avoid in Abu Dhabi
Even with the right materials, certain oversights during preparation can affect the final outcome. Avoiding these common mistakes will help ensure a smooth, durable, and professional finish.
- Skipping surface cleaning: Painting over dust, grease, or dirt can prevent proper adhesion and lead to uneven results.
- Not repairing cracks properly: Unfilled or poorly repaired cracks and holes will remain visible and may worsen over time.
- Ignoring primer application: Skipping primer can result in poor paint bonding, uneven color, and reduced durability.
- Painting on damp surfaces: Moisture can cause paint to bubble, peel, or fail prematurely.
- Rushing the drying process: Not allowing adequate drying time between steps can compromise the overall finish and longevity.
These mistakes may seem minor but can significantly reduce the quality and lifespan of your paintwork.
Achieve Professional Results with Expert Painting Services
Proper wall preparation is the foundation of any successful painting project. By following the right steps from inspection and cleaning to priming you ensure a smooth finish, strong paint adhesion, and long lasting results. Investing time in preparation not only enhances the overall appearance but also minimizes future maintenance and repair costs.
RIEC (Royal Integral Engineering and Contracting) is a trusted name in the UAE, delivering high quality engineering and contracting solutions across residential, commercial, and industrial sectors. With a strong focus on workmanship, reliability, and industry standards, RIEC ensures every painting project is handled with precision from thorough surface preparation to the final coat.
If you’re planning a painting project, partner with RIEC for dependable and professional service. Contact the team today to achieve a flawless, durable finish that stands the test of time.
Frequently Asked Questions (FAQs)
Yes, primer is a key step in how to prepare walls before painting. It improves paint adhesion, ensures even color, and increases the durability of the final finish, especially on new or repaired surfaces.
It is not recommended. Properly following how to prepare walls before painting means checking the existing paint. If it is peeling, cracked, or uneven, it should be removed or sanded before repainting.
When learning how to prepare walls before painting, check for damp patches, discoloration, mold, or musty odors. These issues must be resolved before painting to prevent long-term damage.
As part of how to prepare walls before painting, one coat of primer is usually sufficient. However, for porous or repaired surfaces, two coats may be required for better coverage and durability.
While small projects can be done independently, hiring experts like RIEC (Royal Integral Engineering and Contracting) ensures that how to prepare walls before painting is done correctly, using proper techniques and materials for long-lasting results.